Wednesday, January 4, 2012

Poly Mesh Tutorial

Do y'all remember me posting the picture of the polymesh wreath with the skates?
Here she is...
click on the image to go to that post.
I promised I would be back to make another wreath with a step-by-step for you.
Now that pinterest exists I understand there are a million tutorials out there. 
This one uses stuff you have around your home and literally can be completely finished in 15 minutes.


Take your roll of mesh and let it unroll itself. I draped mine over the back of a chair so it would not get tangled.
Then I grabbed a white wire hanger, a pair of scissors and some zip ties.


Honestly white would have worked for the zip ties but it just so happened I had the perfect matching blue!!
Just like in the video below I began working the mesh around my rounded out hanger.
Yes, they have a fancy schmancy ring with small pieces of garland to attach; but honestly the zip ties work to permanently keep the mesh on the "formed" hanger.


I am calling this method the "pinch-attach-zip-then cinch"


See here how you can cinch the mesh together to make it really full?
After your first layer is complete, (just like in the video) you will start a second layer.
My second layer only has about 4 loops because I knew I would be attaching another element to my wreath.
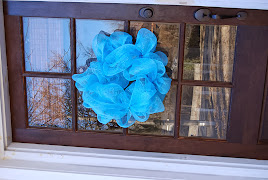
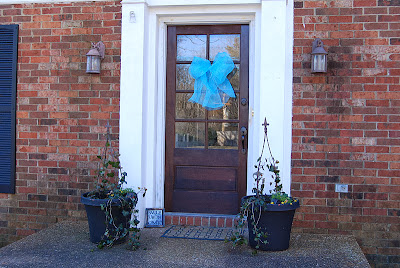
Here is the completed project.
(i think it is time to upgrade the planters by the front door; that will have to wait until this spring though)
 And with the little bit of mesh I had left over I made a bow as well.
You know I Lurve a good bow!!

And while I was out there I decided to show y'all the monogrammed medallion I made for the hospital door.
This was super easy to make. However, the glitter letters were kinda messy. haha

btw... the mesh is now sold at Hobby Lobby. If you purchase the rolls from the gift wrap aisle it is $6.99 (as opposed to the holiday aisle for $7.99) so half off I made a poly-mesh wreath for $4.00.
Free hanger and zip ties and 20 minutes... Super cute way to welcome home our baby boy!!

I am linking up over at Amanda's for Weekend Bloggy Reading

Monday, January 2, 2012

Christmas 2011


Just wanted to do a "mental" highlight of our last christmas as a family of "3"
You know the usual items made their appearance... fashion, games and princess items. 

She was quite a happy little girl!!!

Hope all of you enjoyed your christmas!


Sunday, January 1, 2012

Here is to 2012

Last night I typed a nice long post about all I hope to accomplish and what all I hope the year can hold....


Went to publish and blogger told me I was out of storage... rut row... so for those of you who have had to purchase more memory for your site how much should I buy?

This only appeared from my ipad. Ever had that happen to you? 

Thursday, December 29, 2011

2011 Recap

I had a blast joining in over at Rhoda's last year. This post really helps you see what all you have been able to accomplish in one short year!

We started out the year by adding a gallery wall up our stairway.
(and it didn't get blogged until August... oopsies)
 In February we printed out our first set of Ana White plans and built a book shelf for lil bit's big girl room.

Then I decided to copy-cat and add a stencil wall to the main wall in our master bedroom.
In April I decided to try my hand at upholstery and I recovered this chair.
(as you can tell I got to excited to add the tacks, conceal the bottom, or finish painting the chair before I shared the post!) haha
Then in the end of May and early June I took on my side of the road beauty!
This was a true Labor of Love!
At the end of July we left town for our first ever week long family vacation!
To Disney World we Went. And we had a BLAST!
(as you can see a pint-sized someone started taking on the "I am almost 3 attitude, Lord help me)

Then in August I striped my rug I found at Ikea for our dining room.
At the end of August a friend and I made this.
Tufting was super easy!!

In October we rented one of these machine's and blew insulation into our attic.
We also decided we were over the stenciled wall in our master bedroom and took the plunge with BM Popcorn Kernel. ALL 4 gallons it took!!
Annddd... I lurve it... like big time!!
In late October I tried my hand at a Burlee!
And this whole time we have been working our way through designing our bundle of joy's nursery!
**hope to reveal the room by new years eve... only a few finishing touches....
Head on over to Rhoda's and see what everyone else has accomplished this year!

Kids Bathroom Update

Once we found out we were having a boy we knew a shabby chic pink bathroom would not foot the
bill. I mean, the bathroom is in his room. So we packed away all our cute shabby chic-ness (for another house) and decided to make this a boy/girl bathroom they can both enjoy.
 This is a very narrow bathroom so using less really was more here. 
(Luckily, behind the door is a nice deep linen closet so a lot can be stored there.) 
 btw the yellow lighting and lime green walls made this small space really difficult to photograph. :\
 We found the shower curtain online; Garnet Hill.
And we had someone make the bottom frame and the top distressed frame is from a local crafts fair we attended back in the fall.

 I just stuck a picture I had in the top frame.
In the bottom one is the card of the company who made the frame, waiting on little fella to arrive so I can fill it with pictures of both the kids.
 and yes, we still need to replace the caulking around the tub.. adding that to daddy's"to-do" list.

Tuesday, December 27, 2011

An "All- Boy" Nursery-Client

Recently, a friend from college contacted me about helping her gather some ideas for her nursery.

Her husband has kept all his transformers and what not from his childhood and she wanted to find a way to get the bedding she picked out to go together with some of his "vintage" toys. 

Here is what I was able to come up with.

Also wanted to tell yall I am going to be doing some "maintenance" to the blog this week so I apologize in advance for "re-posting" things. Need to go back and re-tag/organize everything from the beginning. 

Tuesday, December 20, 2011

Christmas Home Tour

So in a scurry to finish a million and a half seeing projects I had almost completely forgotten about doing a quick walk through of our Christmas decor. Please prepare yourselves. It was slim pickin' this year. We have hit the 3 week countdown till baby and I just knew putting up as little as possible was ideal!


We don't have a mantle, so we improvise ;)

And a pop of color above the tv in the den.


Some fun little knick knacks I have collected over our past 4 years together.


And our tree!!


I think the top of this tree is my most favorite!!


Our willow house manger in the dining room. Hope to start adding to it soon and once we have the "stable" I may leave it out year round!

Our beautiful collection of Christmas cards from dear family and friends.

And my pinkaliscious holly platter! It sure does put a smile on my face ;)

Thursday we are hoping to make salt dough ornaments for the grandparents, and decorate the gingerbread house as a family!! I can't wait for that!!!


Thursday, December 15, 2011

Nursery Diaries: Toy Storage

When deciding how we would store all the toys little babies have I had several ideas in mind.
I loved the Idea of built in shelving.

Cube storage is always nice

And true toy bins


I was open to using one of these ideas in the room in some way...
Just wasn't sure how I would execute.
Then on a random Saturday afternoon I made an out of the ordinary trip to Target. ALONE! 
While quietly perusing the aisles I stopped to glance at the Clearance End Rack.
Well if you know me in real life you KNOW "I know Clarence, he is my buddy!" 
( I am often quoting this line. haha)
Anywho, I found one of the cube storage containers with a return discount sticker at the bottom of this shelf. The original price from Target.com is $59.99.
The sticker price said $11.99!! I kid you NOT!!!
Well I packed this guy up and loaded him in the car as quick as I could... you see, sometimes the deal makes the decision for you.
And if you can read the wooden blocks then you can see we have named our sweet boy!!
Can't wait for you to see the close ups of everything once I place the finishing touches on the room. 
Keeping my fingers crossed everything is able to be completed by this weekend.

Tuesday, December 13, 2011

Nursery Diaries: The Great Debate

okay I figured it was high time I get yall's feedback on the great debate 2011!!
You see I am having quite a hard time finding a stroller for our 3 yr old little girl and our soon to be here baby boy. 
Originally I wanted this...
encompassed in this group is the Graco DuoGlide, Chicco Cortina Double
pros:
gets great reviews
several seat configurations
not terrible to navigate with different weighted children
still moderately stylish and priced reasonably
cons:
has a per seat weight limit of 40 pounds per seat....
My very tall always 98%-tile child is currently 36 pounds...

Question here: Why buy a stroller my 3 year old is not going to be able to ride in....

So now the obvious answer is the oh-so-budget-friendly.
pros: 
I know my 3 yr old will be able to ride and I will have a spot for the baby.
cons:
not so stylish, not the most important but come on if I am laying down some cash on something I at least want to like it, right?
reviews say it is hard to steer with larger children
umm need I mention she is 3 and loves to run away right now??? For a mom trying to brave an outing with 2 and one run away leaving me to abandon the baby to chase after her? (we are in our wild let me test your limits stage!!)
ugh, in my book she needs to be bolstered in with a 5 point harness and with no point of getting out without my assistant.

**Any moms out there want to help me change my mind on this one?? I see tons of people using them but they are for an 18ish month old or way older kids who need an occasional rest.

Sidenote: my husband is traveling quite a bit these days, this stroller will be used on a weekly basis for even the simplest of tasks, ie trips to the fabric store, running in to approve pieces for clients, etc.

Okay back on task....
I have read of other bloggers selecting the Baby Jogger City Mini Double
I have done a lot less research on this stroller.
What I do know:
pros:
It seems to go on sale pretty often.
Baby Jogger is a great brand so I know it will hold up and last for quite a while.
Has a ginormo canopy to shade from the sun.
Several reviews show a 5 year old still fitting in the seat and how lightweight this is for a double. 
cons:
does not offer all terrain wheels
handle does not telescope for taller individuals like myself and my husband
The storage basket underneath is hard to access

For me the most impressive double stroller on the market is the Baby Jogger City Select
This stroller just really seems to meet every need out there. 
pros:
Baby Gizmo's video shows her 5 year old climbing in and out of the front and back seat without the stroller flipping over. (SCORE)
weight limit goes up to 45 pounds per seat.. That gives us 9 more pounds of growing!!
the storage basket is accessible from the front and the back
The rear wheels are larger for easier manuevering
The seats can be reconfigured into 16 different seating combinations.
Telescoping handle
Simple folding
I mean just watch this video: 
cons:
the price.... buhl makes my eyes spin...
people complain the rain attachment wasn't included. that is not a deal breaker for me.
honestly there doesn't seem to be hardly anything that bad for people to say about it. 

Now... the real problem, ie the great debate... do I "compromise" and get a sit n stand or the graco... or do I hold out and hope for a really good sale on the piece de la resistance??

Here is Baby Gizmo's video on the City Select if you need more convincing!

You know what I really need?? For Essex to just randomly have one of these at an unbelievably cheap price.

Any wisdom, advice or thoughts are greatly appreciated here. 
The best part of the City Select is it converts single to double and back very easily... All strollers down to one?? That would be nice huh??


Monday, December 12, 2011

O Christmas Tree #2 + decking the halls

These are some phone pictures I snapped once we finished.
I apologize for the "graini-ness" but this house is just too fun to wait to share later!!
Here is the front door.
The console table
The tree!!
The tree and the mantle.
And the bannister of course!!