Thursday, June 30, 2011

Travel Thursdays Ed. 3 Destin

Taking a quick break from the Disney Planning to share my favorite Destin hotspots.

If you have ever been you know what there is to love about the Gulf coast.

If not you are SORELY missing out and must make plans to get down there STAT!!

I have called the Florida panhandle my summer home for the past 16 years. 

We have watch this booming tourist town emerge from merely 10 high rises to now hundreds.

Here are a few pics from past trips.
March 2008
My family minus Nick... This is at our absolute MOST favorite restaurant in the whole panhandle....

The Ocean Club.

It is tucked away in a professional center right next to the entrance to Tops'l.
In the past 10 years of eating here every experience has been wonderful, always with wonderful wait staff and some of the best seafood your mouth will ever see.

Our favorite space in the restaurant to eat is in the Garden Room.

My favorite mexican restaurant in Destin is hands-down La Paz
They have been in business since 1979 and they KNOW mexican food!!
click here to see their menu.
They are located across the street from Louisiana Lagniappe (down the Destin peninsula)

Throughout the years we have done AJ's, Joe's crab shack, Jimmy Buffett's Margarittaville Restaurant, all the touristy hot spots... nothing compares to a good hidden secret frequented by the locals; and these two are my most favorite of those.

We always make our way to SanDestin to Baytown Wharf.

I personally love Poppy's and looking through all the adoreable shops.
Poppy's 
the wharf
adoreable shops
Other favorite spots in the area are Cafe 30A, Bud and Alley's, and Callahan's.
Cafe 30A
Bud and Alley's


If your in the area check out some of these great eats. 

I am sure they won't dissapoint.

Wednesday, June 29, 2011

77 years of bad luck

See this picture??


Well that used to be a 10 foot, I repeat 10 foot mirror.

What had happened was (said in the voice of the ladies man).

Casey used to work part time for one of the Hilton property hotels. This said hotel renovated their conference suite and was trying to get rid of this mirror.

*sidenote: remember how we were "renovating our bathroom" that is now the family joke.
See here.


The bathroom was not a pretty blue with not pretty fixtures. It also has heinous aweful black Cabinet paint job..

Well we painted the bathroom grey, and found new fixtures and the plan was to hang a mirror BEHIND the sconces. This said 10 ft. Mirror is free and would work perfectly if cut down...

So we agree to come get the mirror with intentions for the bathroom I am really excited!! We get mirror, use blankets and bungee cords to secure it and head on our way. We use the main road in our town because we only would need to make 3 turns into our driveway.

The speed limit is 40, we r going 25 and there is no wind.

All the sudden, out of nowhere the bungee cord snaps, and a 10 foot mirror gets air and nearly kills the people in the car behind us.

I screamed like we were being held at gunpoint and immediately call the local police department.

The cop I spoke to laughed and said he would send a squad car.

During this 10 minute stint we backed up and wedged our car in front of the ENORMOUS amount of debris.

And I laugh hysterically while my husband directs traffic!!


Sooo funny!!!

Cop arrived and laughed. Ugh don't you love it when your plans "shatter" haha no pun intended!

We left as the hazardous waste unit arrived to clean up the one hundred million pieces of my supposed to be pretty mirror.

Oh well more adventures in DIY.

At least I have a funny story now huh?

So... if a normal mirror breaking is 7 years of bad luck does one that's 10 feet long constitue 77 years bad luck??

I sure hope not.

Sunday, June 26, 2011

Nursery Storyboards

Do y'all know about Lay Baby Lay??

It is a wonderful resource for nursery and young children's rooms. 

I am absolutely smitten with this room!!

Maybe if we have a little boy I will do something similar to this.
Another thing I really love about her style boards is quite a few of the items come from etsy shops. So important to feed the small business' of America. 

Happy sunday!

Thursday, June 23, 2011

Travel Thursdays Disney tues-thurs

Soo I skipped last weeks edition... oops!!

Back to scheduled programming. 

Recap:
Sunday arrive, swim, downtown disney
Monday Mary Poppins character breakfast, magic kingdom, lunch at the royal table

Now... on to 
Tuesday.

This is probably going to be my most favorite day of all. 
We will be spending the day at Typhoon Lagoon!!!

I remember spending a whole day in the lazy river and running through Katchakiddie Kreek as a little girl! 

Casey can't wait to swim in the sharks reef!!!

Wednesday 
we will conquer Animal Kingdom
not sure how much we will accomplish here but the main focus is to do the safari.

Lil bit LOVES animals so this is a must for us!!

Thursday

I am considering leaving this day as a free day; as of right now though the plan is to go and visit my sweet friend Rachel at Sea World!!

{She is in Orlando for the summer doing mission work and the organization arranges work for them during the day at the parks. pretty cool huh?}


Any suggestions while we are there??

Any of you travelled with a toddler, while pregnant to Disney?? Would love your ensite!!

Be back next week to outline friday and saturday...

Tuesday, June 21, 2011

An Explanation

So.. I owe all of you an apology... 
for very exciting reasons I have been feeling a little under the weather in the past few weeks...
you see,
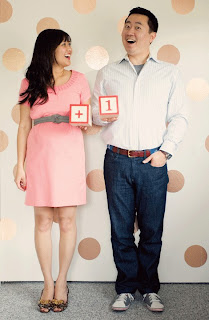
Just after the first of the year our family will be...

{isn't this the cutest picture ever??}
This will be my first time to fully decorate a nursery and I can hardly contain myself.


Right now I am making alot of these to load up in the etsy shop...

The whole family is very excited about our new addition, so for now... some renovations may be on hold and we will be shifting our focus to more pint size proportions.

Is everyone cool with some more baby/toddler oriented content for a while?? 
PS. planning on adding some pictures back to the home tour tab soon. 
just needed to do some "cleaning up" if you know what I mean.

Thursday, June 16, 2011

Upholstry, the story of a club chair.

I have been quite spacey this week and TOTALLY forgot to tell you all I shared my chair upholstry over at Cheap Chic Home on Tuesday, oops!!

Well this post will be the first in my actual "Tutorials" tab. 

Enjoy and if you have any questions at all feel free to email me.
Jenn32404@aol.com

 "what I wanted to learn  teach myself in 2011." 

It's Upholstry!!!

You see my neighbor placed this lovely club chair by the curb last spring and I just couldn't let it remain sitting there.

As you can see, I was very eager about starting this project, so a piece here and there was taken off pre-photo.

These pieces on the arms were removed first. 
Then I started a corner in the back and kept on going. 

At some point I had to cut the fabric because it was in such poor condition all it would do was start crumbling.
The only tools I used at this point were a pair of needle nose pliers...
 And a pair of wire cutters, they were great for really deep staples as the point could begin working the staple out.

once the top arm piece was removed I worked the outer sides off.
Until everything was gone

So order of removal was back, outer sides, insides, then front and back.
Notice the orange foam?? It was dry rotted, so I grabbed a bag of rolled batting to fill in over the springs.
removed the dry rotted orange foam.

Then I laid out all my saved pieces and used them as my pattern to cut the new pieces.
Laid out the new batting
I knew the arms would be fairly difficult so after cutting the front and tucking it in I began with the inner arms. 
**note to get the fabric to tuck into the bottom cushion and on the sides sometimes you will need to sit on the chair with your knee's to depress the springs and work the fabric to the back of the chair.

Then Grab your stapler, (I don't think an electric is a must but it surely helped!!) and don't forget to notch your curves so the fabric will lay flat.
This is notching.
 On the outside pieces I flipped the fabric right sides together and began stapling from the underneath side, from time to time I used the hammer to work some of the more stubborn staples in.
Then I pulled a staple or two out and began on the arm.
.
Lesson 1. this is TRULY a trial and error process!!

On the front seat I laid the fabric out and placed pins along the front corners of the chair to sew a very simple 6 " dart for better fitting.
Don't forget to cut excess fabric out before you attach to chair. 
Then you simply attach in the back of the chair 

Work your back piece on.

**note:When taking the chair apart I kept all the card board sheets and metal sheets I found inside the chair.

Here is where you will need to use some of the interior metal stripping, if any.

The big long pieces I used along the sides in the back of the chair; this added the nice straight line to make the fabric pull taught!!

Then sit back and admire your creation!!

Upholstry took patience and being able to walk away from the project for a while.

I came by the next day with a fresh mind and ready to work. 

Took me 4 days in all working about 2-3 hrs a day. 

And... saving me the $375.00 someone quoted me to upholster it!!!

Deal!!

Tuesday, June 14, 2011


Wanna join me under this deligtful umbrella?

And dear heavens!! I would love to have buschels of these heavenly peonies.


Uh!!! in the words of Mary Poppins: "Pratically perfect in every way!!"
It's true.. I am positively completely and utterly Obsessed with Pinterest!!!