Showing posts with label DIY. Show all posts

Thursday, October 30, 2014

Orc: Week 5

Seven days. 
S E V E N. (Minutes in heaven. Just kidding) 

I feel like I am running a triathlon with this room. Swimming was easy, biking has been so so. But running this last leg errr week in. I am having to dig deep and see what we can pull off. 

Paint finally arrived for the hardware. 

I bucked my gut feeling and instead of the beloved brass I went with chrome. 

Chrome paint is hard to find... No? 

Well it is. I read a lot of reviews and tried rust oleum. Then bit the bullet and purchased Champions Sterling silver spray paint. 

Look at the difference y'all. 

It's eons above the competition. Worth the splurge. 
See bottom left? 
Killer!!!!!

We purchased the fabric For the bar stool cushions!! Then we traced and cut the foam to place the inserts in!! 

Real life pics y'all!!! 

And most notable progress is the venthood surround. 

Getting so close and this is going to make such a huge impact!!!


Now that hardware, majority of fabric and the grit and grime of the cabinets is over time to start the cabinet doors. 

So close yet so far away! 

Time to run the last leg of this crazy fast Reno race!!!

Hop on over to Calling It Home and see how everyone else is doing! 

The hosting designers are KILLING it!! 

Happy Halloween Eve y'all! 

Saturday, August 2, 2014

Transformation Thursday

I was super excited to show yall a quick transformation today but I had a spray paint debacle. 

I am assuming there is a run in the color so I am going to head up to the store to see if I can get another can :)

We found this cute little tool bench at a garage sale for $5.00.

I just knew we could transform it into some thing precious to put in c's room!!

We have been collecting some Melissa and Doug tools and other accessories over his last two birthdays to make this into a fun little play space into his room!!

So ready to finish this up and show yall just how cute its going to be!!

*went to the store, took the tool bench with me and the associate was less than helpful ;( 
Fingers crossed this can works! 

Thursday, May 8, 2014

Welcome y'all: inspiration

The entry of this house is in desperate need of some personality!

It's so important to make a good first impression when welcoming someone into your home. 

I have always loves stripes. They just bring such a boldness to a space and I can't wait to stripe our entry area.

Just like in these pictures the stripes will need to lead up into the hallway upstairs


All this inspiration.... I am seeing lots and lots of frog tape in my near future!

Wednesday, June 26, 2013

Acrylic Tray Tutorial

I have been meaning to get this post up for quite some time. 
So apologies to those on Instagram I promised I would share this!!
(This is for you Stacy Heckman)
I am sure by now you have all seen the acrylic trays people are using in their homes.

via pinterest, having a hard time embedding the links. so sorry.

via pinterest.
so sorry I am not tagging the original pinner, please forgive me.

But what if you want several sizes???
Recently I was reading a blog who purchased her acrylic "trays" that are actually the acrylic 1" frames from michaels.
Here is how to make your own...
Step 1:
Purchase acrylic frames from michaels.
Step 2:
Add your desired design motif to the top of the frame. (from the inside of the frame the design will reflect once it is in "tray" mode)
I knew I wanted a polka dot design, so I used an eraser to dip in my paint for a perfect dot.


Obviously this step is pretty redundant, but use an at random pattern, trying to remember less is more, dont overpopulate the dots. haha.
Step 3:
Let the dots dry.

Step 4:
after the dots have dried add your desired final coat. 
I chose a champagne colored pearlescent pain.

Step 5:

Sunday, May 5, 2013

A Table for Six

One of the things I wanted to make sure we had before baby was more than 4 chairs around our table.

I spotted this chair at a local store a while back and have been watching it.

Doesn't match my other chairs perfectly but when I went in last weekend and they were on super clearance for $21.00 a piece I knew I could chalk paint them to match the table!!!

Can't wait to start the painting process!

Wednesday, April 24, 2013

One Tiny Ottoman at a Time

I am embarrassed to say it took me well over a year to find just the right fabric for this ottoman!

These two premier print fabrics go together so nicely!!

We love to snuggle up with the babies and read in this corner before naps and bedtime.


Sources:
Chair-ikea
side table-kohls
ottoman-had that thing Forevah!
The fabrics are premier fabrics prints. 
I do not think the stripe is available any longer. 
It was from a collection from 2012 I believe they retired to bring out some new collections.

Friday, April 12, 2013

From Wash to Stain

Remember my post from a few weeks back about my wooden spool for our patio???
Out with the old in with the old??

Well I attempted to gray wash it and the wood just Soaked it up...

Second attempt I went out to the garage to discover I had a decent amount of stain left from working on our front door ;)

After a quick hour in amazing spring weather and Tada!!

Very excited to start dining around this table this spring!

Thank you Restoring Piece of Tuscaloosa, Alabama for such a unique piece!

Now time to style the table and enjoy a nice grilled dinner on the porch!


Monday, February 11, 2013

Valentines Decor and a Craft Repost from Last Year


In my usual DIY fashion I added another polymesh wreath to my collection this year.


Found some hot pink almost fuchsia mesh at hobby lobby and made the same style wreath I made like when the baby came home from the hospital.

I had the love sign left over from last year. ( was a kohls clearance piece for 1.00) added just the right pop I was needing!!

Inside, we have our pinterest valentine mailboxes.

And on my scallop chalkboard I added some 99 cent chipboard letters I found at target.


Now time to prepare the menu and add some bows to my loves little happies!

Okay so...have a confession... I like to make things really really difficult on myself.
ie.. handmake a banner without a die cutting machine! TRUTH!!

Anyway, it turned out to be quite fun so here are the steps if you so choose to join me in making one.
Here is what I started with.
note: what you think you are starting with and what you acually may end up using tends to change!
Step one:
Use the circle tracer and make your circles for the background, the cut out circles.
 Step two:
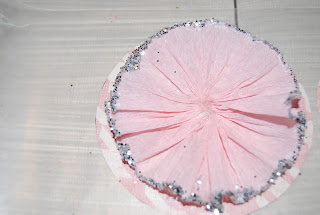
Find a needle, thread and crepe paper. Use a weaving method to thread the paper and slowly gather. this will create a ruffled affect in the paper.
*glue the backsides of the ruffle medallion together with craft glue
Step three:
Glue the center of the medallion together and let sit for a few minutes, then glue the outside edges of the medallion and dip in glitter along the outside edge.
Step four:
hot glue on chip letters, hot glue medallion onto "backer" paper
(I used the remainder of the letters of a box from a christmas banner I made)

Step five:
this was the point where I realized I needed a second background so I dug in my stash of scrapbook paper and found this stripe. I used the outer edge of my tracer to scallop this paper and cut it out.
 then hotglue the background to the other pieces.
Step six:
punch holes into the corners of the backer paper and string letters together with either ribbon or twine.

Step seven:
Hang and enjoy!

*this year my hugs banner is hung but I went a different route for the front door, have you followed along on instagram to see?


Tuesday, December 18, 2012

My Favorite Free Christmas Printables Round Up

Anyone getting close to running out of gift tags??

I don't know about you, but all of these adorable, downloadable, free printables are soo much cuter than the store bought ones!!!

(I have checked these links and downloaded a few of my own so you should not have any problems.)

And I LOVE this believe banner!

This site, Kbecca.com, has a email sign up from freebies and her printables are super cute and around $2-$3.00!!
click the image
The ones I saved I cannot seem to find the link. The labels look like the images above!

And I saved the best for last!! 
Printed approxtimately 5 sheets of this one!!!

click the image for the link to print!


Friday, December 14, 2012

Creative Wrapping!!

I have had several people ask for me to explain how to wrap in cellophane!

So without further adieu!!


Hope everyone is getting in the Christmas Spirit. 
I have taken a few days break to enjoy my babies and pray for the families who have lost so much. 
I think what hurts the most is knowing people around me, and possibly parents of these sweet children may not yet have my Jesus in their heart to fully appreciate the birth of the Risen King. 

Please don't miss an opportunity to share Christ this season. 

My mom has the coolest story of handing out a bible track on Black Friday at Kohls! 
Made me cry hearing about how fired up for Jesus this man was!!