In my usual DIY fashion I added another polymesh wreath to my collection this year.
Found some hot pink almost fuchsia mesh at hobby lobby and made the same style wreath I made like when the baby came home from the hospital.
I had the love sign left over from last year. ( was a kohls clearance piece for 1.00) added just the right pop I was needing!!
Inside, we have our pinterest valentine mailboxes.
And on my scallop chalkboard I added some 99 cent chipboard letters I found at target.
Now time to prepare the menu and add some bows to my loves little happies!
Okay so...have a confession... I like to make things really really difficult on myself.
ie.. handmake a banner without a die cutting machine! TRUTH!!
Anyway, it turned out to be quite fun so here are the steps if you so choose to join me in making one.
Here is what I started with.
note: what you think you are starting with and what you acually may end up using tends to change!
Step one:
Use the circle tracer and make your circles for the background, the cut out circles.
Step two:
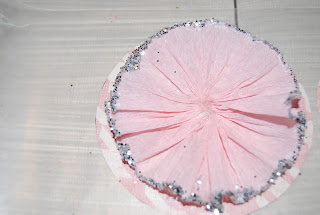
Find a needle, thread and crepe paper. Use a weaving method to thread the paper and slowly gather. this will create a ruffled affect in the paper.
*glue the backsides of the ruffle medallion together with craft glue
Step three:
Glue the center of the medallion together and let sit for a few minutes, then glue the outside edges of the medallion and dip in glitter along the outside edge.
Step four:
hot glue on chip letters, hot glue medallion onto "backer" paper
(I used the remainder of the letters of a box from a christmas banner I made)
Step five:
this was the point where I realized I needed a second background so I dug in my stash of scrapbook paper and found this stripe. I used the outer edge of my tracer to scallop this paper and cut it out.
then hotglue the background to the other pieces.
Step six:
punch holes into the corners of the backer paper and string letters together with either ribbon or twine.
Step seven:
Hang and enjoy!
*this year my hugs banner is hung but I went a different route for the front door, have you followed along on instagram to see?


2 comments:
haha! Not surprised by this... but I have those same plates that you have your glitter on! :)
abigail!! we like WAY WAY WAY too many of the same things!!
Post a Comment