Showing posts with label Tutorials. Show all posts

Tuesday, November 20, 2012

Christmas Handtowel Tutorial

Hey there! 
It's been quite a while since I have shared a diy craft with yall and I wanted to sneak one in before a long weekend. 

This would be a great project for you to do with some girlfriends, or even the women in the family over the thanksgiving weekend. 

The first and most important thing to remember with this craft is to not complicate the items. 
You will need:
*any type of hand towel, 
(I found mine at target in a 2 pack for I think $3.99)
*scrap fabrics
*sewing machine or fabric glue
*some ribbon
*straight pins

1. First thing I did was trace a quarter for the berries, cut out my triangles for my trees, rectangles for the stumps, then I googled holly leaf and freehanded a shape.
(you can always print off some clipart, cut it out and use it as your pattern)

2. Pin down the design and zig zag the design onto the towel
Note: if you do not have a sewing machine or cannot sew you can purchase fabric glue and put a thin layer of glue on the pieces and attach them to the towel.

3. Attach either a ribbon or ric rac to the bottom edge of the towel.

These would make great little teachers gifts, or a happy for a friend. 

Can't wait to see and hear what you come up with!
ps. sorry for the poor photo quality, considering changing to a new camera all together because everything is malfunctioning :(
Follow Me on Pinterest

Monday, October 22, 2012

Camera woes

Soo my charger to my camera has gone AWOL!

I feel so naked to not have my camera go everywhere with me!!
(HENCE THE LACK OF POSTS!)

Just wanted to stop in and tell yall the minute i get a new charger i am going to sign up to take my first online class with Shoot Fly Shoot.
(click the tab to the right to head straight to their site)
ShootFlyShoot.com
(or click the image above)

If you don't know anything about Shoot Fly Shoot one of the guys who runs the site is Kevin, 
as in.. Kevin and Layla 
from the blog the Lettered Cottage.


I have clicked through some of the demo info on the site and let me say I am fired up about learning more about shooting specifically interiors to bring yall some more high quality photography on the blog! 
They are currently offering photo 101 and intro to photoshop elements!

I must say the photography classes I took in college were geared toward fashion and lights and blowing hair, etc so I am ready to brush up on my skills!

Plus my Photoshop emphasis was on Illustrator so this is a great excuse to learn elements!

Click over at the link on the right and check em out! You wont be disappointed!!

Did I mention you can NOT beat the price!

Monday, September 10, 2012

Project Fail....

Ever had one of those incredible ideas... get half way thru and think its going great...


Cut out one of your favorite cute little maps from a magazine...
(that you have been holding on to since 2005.. just sayin')

 Mix the perfect color coral


Paint canvas with beautiful coral


Then... fail fail fail with the mod podge...


Ruined... for evah!!!
makes me tear a little and yet I don't have the heart to do away with said fail...

So here's to what I thought would be a really good idea to share with you guys that turned into a really bad idea. :(

Hapy DIY'ing y'all.

Saturday, April 28, 2012

DIY Wooden Picture Frames

**update..... August 2014, its time to revise and revamp this tutorial. right?? working on doing that right now!! stay tuned for a reveal in September 2014

Are you a fan of rustic picture frames??

(via)
These frames are by 2 princesses and 2 frogs. They can be purchased at a local store.

Here is an enormous display of some similar frames.
(via)
I am going to attempt to recreate these with some scrap wood I have in my garage.
Have you seen these on pinterest??

Looks pretty easy.
And much more cost effective to make your own!!

Here is what I came up with.
My "hack" for a $60.00 frame. yes... 60 bucks for scrapwood!

My inspiration:
I purchased one of these frames then decided I could make my own to create a "collection" of this type of frame.

Supply List:
*gorilla glue
*assortment of acrylic paint
*scrap wood
*small mounting  board from hobby lobby or local craft store.
*small clip frame from hobby lobby or local craft store
*paint brushes

btw: Found the mounting board on the unfinished wood aisle in hob lob.

Step1:
Gather some scrap wood and decide which direction you want the wood to go in. These pieces were actually one long 1x2 I had my husband cut down.

Step2:
Have the pieces of wood cut the same length and use your gorilla glue to make a small bead of glue between the wood. 
Sit and let "set" for a little over an hour.

Step 3:
Paint the scrap wood layer with a coat of paint and let dry
Paint the mounting board layer and let dry.
Step 4:
Use your gorilla glue to do small dots or a bead of the glue, don't forget to lay something heavy on top for the glue to disperse evenly.

Step 5:
Nail a small nail into the mounting board to attach the clip frame from,
also sand the edges of the mounting board and the edges of the wood.

Step 6: 
Decide where to hang, what picture to use, then step back and enjoy!
I think a new school picture will do nicely!
(sorry this one is crooked)

For comparison:
mine $3.00
theirs $60 + tax


LOVIN' $3.00 ALL day Long!! 


Tuesday, March 27, 2012

Burlap Carrots Tutorial

Recently a friend of mine found these adoreable carrots on pinterest.

I went to pinterest and I thought I would type up my version of how to put them together. 

Cost me around $4.50 and is super cute to boot!!
isnt she just the cutest thing ever??

Step 1: 
purchase 1 yard of orange burlap for about 3 large carrots
 (I found mine at Hobby Lobby)

Find some fun spriggy fillers in the floral department
(Mine was left over from christmas decor)

purchase one roll of ribbon

If you don't already have any poly fil get some of that, or I have seen people use plastic grocery store bags as filler!

Supplies:
scissors, glue gun, pony tail holder

Step 2:

Cut the burlap into a triangle shape.
Then use the hot glue gun and glue the two angled sides and the bottom together.

Step 3:
Fill the carrots with poly fil
Step 4:
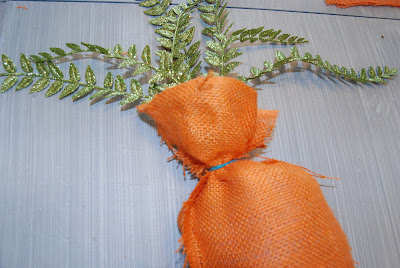
Gather the carrot at the top and attach an elastic ponytail holder.

Step 5:
Stuff the green "spriggy" filler in the top of the carrot and tie a cute knot of ribbon around the carrot.


Step 6: 
Attach a small piece of ribbon or twine to the backside of the carrot to have something to hang the carrot from.

Hang and enjoy!!
(somehow through an update the images have rotated and become distorted, locating the original image to repost for y'all!)
The other two are hanging on my gate!!
(and they need some filler!)
Love having something bright and cheery to drive up to!


Sunday, February 19, 2012

DIY: Silk Flower Arrangement

Some say it is a blessed talent to be crafty, I call it a blessed curse. 
I just have a really hard time paying for something I know good and well I can either make on my own or easily recreate. 

Here I where I insert pictures of very expensive, unbelievably realistic looking silk floral arrangements
image courtesy of first fruit collection blog
This is an arrangement from the store I actually purchased the stems from.
Most of these arrangements run between 89.00-499.00 (depending on size)
 image courtesy of google
This is a live arrangement but could easily be recreated in high end silk pieces.

Step 1:
Fill vase of choice with floral foam. 
The foam comes in rectangular pieces, I just used a kitchen knife to trim the pieces down and fill the vase to the rim. (the stakes of the flowers will "adhere" the layers together)
(sorry the images have become distorted)
Step 2:
Fill the vase with the "innermost" pieces. For the wheat pieces it took way, way more than anticipated. I only planned on using one buschel of the wheat but ended up needing both.
Step 3:
Fill the vase with the lower "filling" element, this layer is not as thick as the middle. I cut the stems of the ferns down and manipulated the pieces so they alternated directions. 

Up close picture.


Step 4:
Cut the stalks of the color-pop accenting piece.
 And fill in around the vase every few inches.
Step 5:
Enjoy your beautiful centerpiece that cost you less than half the price.
When the arrangement isn't sitting on the table it is resting on our sideboard!! :)

Cost Breakdown:
vase $16
wheat buschels 2 at $8
red stalks 6 pack for $6
fern buschel $6

Total: $44 plus tax. not half bad.

Any questions feel free to email me at jbrodden@gmail.com