Wednesday, February 20, 2013

A Nautical First Birthday

Garsh, it has taken me forever to get all these pics loaded in.
So sorry for the delay!
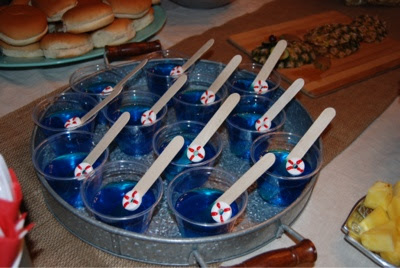
Loved these two super easy pinterest food finds. 

They were quite the hit!

This is kinda a pinterest flop... he is supposed to be a pineapple alligator!
These cookies are compliments to Whimsy Cookie Company.
I winged it on these and actually grabbed them the day before the party from their cabinet! so fun!
Finally got to use my gorgeous fish serving pieces we got as a wedding gift!
Some of the guests dining!
The happy birthday boy himself!


My two sweet babies!
Sister was quite the helper in opening gifts!
He LOVED the firetruck from Aunt Ainslie!!
And he Really wasnt sure what to think of the sparkler on his cupcake!!
Happy Happy one year birthday my sweet boy!!

Sunday, February 17, 2013

Valentines Day

My husband was out of town for the Day of love so we thought it would be fun to drive down and see him and eat dinner with him!
He was in Clarksdale, Ms staying in some lofts!
We had a great time and a wonderful dinner at the Yazoo Pass


Monday, February 11, 2013

Valentines Decor and a Craft Repost from Last Year


In my usual DIY fashion I added another polymesh wreath to my collection this year.


Found some hot pink almost fuchsia mesh at hobby lobby and made the same style wreath I made like when the baby came home from the hospital.

I had the love sign left over from last year. ( was a kohls clearance piece for 1.00) added just the right pop I was needing!!

Inside, we have our pinterest valentine mailboxes.

And on my scallop chalkboard I added some 99 cent chipboard letters I found at target.


Now time to prepare the menu and add some bows to my loves little happies!

Okay so...have a confession... I like to make things really really difficult on myself.
ie.. handmake a banner without a die cutting machine! TRUTH!!

Anyway, it turned out to be quite fun so here are the steps if you so choose to join me in making one.
Here is what I started with.
note: what you think you are starting with and what you acually may end up using tends to change!
Step one:
Use the circle tracer and make your circles for the background, the cut out circles.
 Step two:
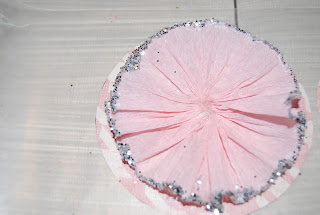
Find a needle, thread and crepe paper. Use a weaving method to thread the paper and slowly gather. this will create a ruffled affect in the paper.
*glue the backsides of the ruffle medallion together with craft glue
Step three:
Glue the center of the medallion together and let sit for a few minutes, then glue the outside edges of the medallion and dip in glitter along the outside edge.
Step four:
hot glue on chip letters, hot glue medallion onto "backer" paper
(I used the remainder of the letters of a box from a christmas banner I made)

Step five:
this was the point where I realized I needed a second background so I dug in my stash of scrapbook paper and found this stripe. I used the outer edge of my tracer to scallop this paper and cut it out.
 then hotglue the background to the other pieces.
Step six:
punch holes into the corners of the backer paper and string letters together with either ribbon or twine.

Step seven:
Hang and enjoy!

*this year my hugs banner is hung but I went a different route for the front door, have you followed along on instagram to see?


Lately...

Whew, I think someone switch my life into cruise control at 70mph. I was hoping to blog every day this month but that hasn't gone according to plan.

Here is an iPhone dump of what we have been doing!

How does the mind so quickly forget growing a baby is hard work!!

Be back with valentines decor!


Monday, February 4, 2013

Let's Talk Skin Care

A couple of months back we talked about mascara.

I got several emails saying those of you would like to know what everyone was using for her skincare routine.

I must admit, mine has been quite simplified and I stick to just a few companies.

After years of battling minor breakouts in the "t-zone" I invested in a 10 facial series of microdermabrasion, followed by prescription Retin-A and minocycline.

After about a year my skin had cleared and the esthetician recommended I begin a very mild and as natural as possible regimine for my skin.

At the time a girlfriend was using Bobbi Brown products so I gave them a try, here I am all these years later and I ALWAYS use her mild cleanser.

I rotate Trish McEvoy Toner, Burt's Bees Toner and Bobbi Brown Toner.

And for removing eye make up I rotate between Trish and Bobbi Brown.


These are the 3 products I am currently using!

For a moisturizer I rotate between Clinique Moisture Surge, and by luck of a Sephora sample, Laura Mercier Tinted Moisturizer (best for the summer and I don't wear foundation then!!)


The only other thing I do to my skin for maintenance purposes is the occassional mask.

I have had this bottle for seriously 3 years. I do maybe 8-10 masks in a calendar year and I still feel it working!!

I have never bought much Origins but this mask I am SOLD on.

(click the image to see the item on sephora's site)

So your turn, share what you do. 

Would love to do a round up post of people's favorites and why they use what they do!!!


Thursday, January 31, 2013

Evolution of a Hallway

While we have lived in our home this poor hallway has had some sort of an identity crisis.

After we moved out last summer, then moved back in we decided to rehang some of our favorite light fixtures. 

One was the globe light from Pottery Barn.

After asking probably, oh.... 100 people their thoughts on stripes I Finally took the bull by the horns and did it!!

Naturally all the other walls will also be painted Revere Pewter by Ben Moore.

I wanted this hallway to have some classic touches with a fun fresh feel. 

Here is to hoping this is the last time I have to do anything in this hallway.
ps. after painting this piece with Annie Sloan Chalk Paint I discovered I did it totally wrong and will likely be re painting it. 
The work is never done. 

Wednesday, January 30, 2013

Nursery for 2 Part 2 (of infinity...)

I feel like we are making headway on the nursery.

With the cleaning out pretty much complete and we have started to make room for baby.

Here is a flashback of the styleboard I shared a few weeks back.
This is what the new baby's side of the room I am planning will look like.

This is what C's side of the room looks like.

Dont Judge it's not totally picked up, I grabbed this really quick before bedtime last time.
This shelf used to be in the kitchen, next to the desk.
It is perfect in here though, to organize, and help little guy easily access the few things he grabs throughout the day. 

I think we need to do a quick facelift on the back of the cabinet.

Would a map look dumb back here?

And this little wall fits the changing area needs.


Here is the view from the door to the bedroom.

And A recap of the new babies side...
Styleboard:
Actual Room:

Right now it is a blank slate and once we get the crib and chair back in here we will start making some headway. 

Whew, halfway thru these next 4 months are going to fly!