Showing posts with label sewing. Show all posts

Wednesday, January 23, 2013

An Easter Basket

This is a fun little design and can be customized to any color combo! I think it would be precious in pastels as well!!


oopsies, this was supposed to be posted to my other blog. ;/
Anywho I am really starting to get into this embroidery and applique stuff!! 
Go check it out! 
I am going to add a link to the etsy shop for ease of use. 

Thursday, June 14, 2012

Sneak Peek

For those of you who do not follow along on instagram you may not know I helped coordinate her wedding reception this past weekend. I had a blast. 

To see the rest of the photo's hop on over to the facebook page to see everything.

Sunday, March 4, 2012

Master Bedroom Update #2

So remember that fabric swatch I have been hanging onto for close to 6 months??
I FINALLY broke down and made it!

IF you missed the post back in october about painting our bedroom  click here.
The original master bedroom reveal was here.
And here is the rooms inspiration.
Quite the metamorphasis!! 
Now to purchase the standard shams and my waterfall skirted comforter! 
One day we will finish this room. haha Two years in the making!

Stay tuned for a picture frame tutorial coming soon!

PS. I was terrified to sew the circular ends, ended up being easy peesy lemon squeezy!!

Friday, June 25, 2010

New Preppie Peonie Pieces

As you can see baby has been doing her fair share of helping out lately!
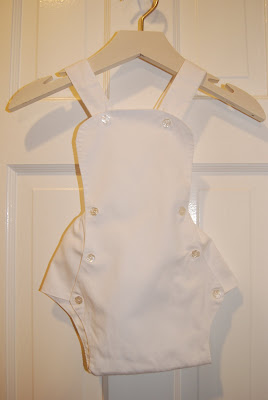
A little sun suit, for a little boy... (no one is not on the way but i just LOVE this pattern)

This little top will get baby's monogram added to it!!

And every little girl's summer wardrobe needs a new applique!

Thursday, February 18, 2010

Preppie Peonie

For those of you I have met through Mrs. Pearls and Grace's McLinky party also check out The Preppie Peonie.

This is my applique site.. This is my new hobby. A little bit about me....

My love.... DESIRE... GOD GIVEN TALENT is sewing. I could sit down at my sewing machine, turn the sucker on, change the settings and just go.... I literally have sat at a machine for almost 12 hrs straight in college working on various projects. On preppie peonie you can be directed to my wordpress site where i started my portfolio. (hence started) my current two blogs are for me to showcase the work i actually have done on my own without a class room.
My grandmother was a wedding dressmaker. My mom a french hand sewing master. And me... i dabble in a little of everything. (but i am scared silly of making a wedding dress)

I learned how to sew at 9. I taught myself to smock at 13. And began learning Adobe Illustrator, and Auto-CAD in college. The most exciting thing about sewing to me is pattern making. I want to be able to buy some muslin drape my form then create my own pattern, my own look, my very own specialized just for me dress. What do i need for this outlandish task???

A DRESS FORM
I am currently in the market for a professional WOLFE dress form. These suckers can set you back as much as $400 bones. I am about to start scavaging all thrift stores and flea markets come spring and hope someone has one of these fabulous gems tucked away somewhere just waiting for me..

For now i will just dream and one day soon begin to sketch again. Right now those dreams are being lived vicariously through one of my college school mates, Anthony. He is on the current season of Project Runway.

Thursday, November 5, 2009

2 hour curtains!! oh.. and basic sewing skills.

Okay so wanted something with a Luxe look. 
Seeing as my husband is still in school and i knew he wouldnt allow me to hop on over to the curtain exchange and drop oh... $500 bones on drapes for our kitchen I got crafty... 
I mean honey my wheels were really turning. 
So here is what i came up with. First i went to Marshalls, T.J. Maxx, and Stein Mart looking for solid colored faux silk panels i could snaz up... 
Here is what I found.

I know aweful picture. I drapped it over the highchair. sorry. So then I bought some striped fabric from hancocks and found the perfect matching paisley fabric at joann's. 

So far i spend 29.99 on the panels, 10.00 on the striped fabric at hancocks, and 20.00 on the fabric at joann's. so running total.$60.00 bucks. 
Then i cut my striped fabric on the bias (45 degree angle) so i could gather the fabric for a uniform ruffle.
[ for those of you not up to par on your sewing knowledge most silks chiffons, taffeta's and organza "lay" properly when cut on the bias. This could be used for a men's tie, one of those gorgeous bridesmaid's dresses, swag curtains, and even skirts.]
Then i sewed down this ruffle and attached it to my panels.

This is wherer the craftiness began. I gathered the top portion of the panel and used a good ole fashioned poneytail holder and wrapped it around the curtain. 

(I feel they are much more durable than rubber bands.)
Over time rubber bands deteriorate and poneytail holders only break if you stretch them too far.

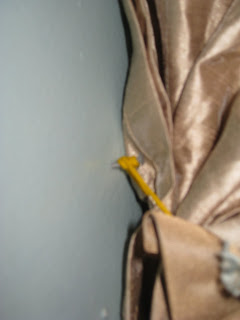
Then I nailed a hole in the wall. and hung the poneytail on the nail.
Next, I used my scrap fabric from my ruffle to make a 'cover' to hide my poneytail holder and i fastened in the back with a safety pin.


Now turn that sucker to 'hide' in the back and you have two lovely panels.

Now for the center section I used the lid to my cake dome for the shape. 
This is where you have to be a little crafty and gradually form the curve at the end. all i did was turn the fabric on the bias, at the bottom form my rounded edge, pin RIGHT sides together on the three sides and sew. 
Flip rightside OUT and make a panel to slip a rod in and hang. 
VOILA!!

two hours later you have a BEAUT of a kitchen window...

Enjoy!! 
Email me if you have any questions.
jbrodden@gmail.com