Tuesday, June 21, 2011

An Explanation

So.. I owe all of you an apology... 
for very exciting reasons I have been feeling a little under the weather in the past few weeks...
you see,
Just after the first of the year our family will be...

{isn't this the cutest picture ever??}
This will be my first time to fully decorate a nursery and I can hardly contain myself.


Right now I am making alot of these to load up in the etsy shop...

The whole family is very excited about our new addition, so for now... some renovations may be on hold and we will be shifting our focus to more pint size proportions.

Is everyone cool with some more baby/toddler oriented content for a while?? 
PS. planning on adding some pictures back to the home tour tab soon. 
just needed to do some "cleaning up" if you know what I mean.

Thursday, June 16, 2011

Upholstry, the story of a club chair.

I have been quite spacey this week and TOTALLY forgot to tell you all I shared my chair upholstry over at Cheap Chic Home on Tuesday, oops!!

Well this post will be the first in my actual "Tutorials" tab. 

Enjoy and if you have any questions at all feel free to email me.
Jenn32404@aol.com

 "what I wanted to learn  teach myself in 2011." 

It's Upholstry!!!

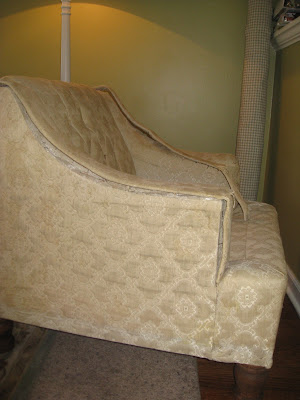
You see my neighbor placed this lovely club chair by the curb last spring and I just couldn't let it remain sitting there.

As you can see, I was very eager about starting this project, so a piece here and there was taken off pre-photo.

These pieces on the arms were removed first. 
Then I started a corner in the back and kept on going. 

At some point I had to cut the fabric because it was in such poor condition all it would do was start crumbling.
The only tools I used at this point were a pair of needle nose pliers...
 And a pair of wire cutters, they were great for really deep staples as the point could begin working the staple out.

once the top arm piece was removed I worked the outer sides off.
Until everything was gone

So order of removal was back, outer sides, insides, then front and back.
Notice the orange foam?? It was dry rotted, so I grabbed a bag of rolled batting to fill in over the springs.
removed the dry rotted orange foam.

Then I laid out all my saved pieces and used them as my pattern to cut the new pieces.
Laid out the new batting
I knew the arms would be fairly difficult so after cutting the front and tucking it in I began with the inner arms. 
**note to get the fabric to tuck into the bottom cushion and on the sides sometimes you will need to sit on the chair with your knee's to depress the springs and work the fabric to the back of the chair.

Then Grab your stapler, (I don't think an electric is a must but it surely helped!!) and don't forget to notch your curves so the fabric will lay flat.
This is notching.
 On the outside pieces I flipped the fabric right sides together and began stapling from the underneath side, from time to time I used the hammer to work some of the more stubborn staples in.
Then I pulled a staple or two out and began on the arm.
.
Lesson 1. this is TRULY a trial and error process!!

On the front seat I laid the fabric out and placed pins along the front corners of the chair to sew a very simple 6 " dart for better fitting.
Don't forget to cut excess fabric out before you attach to chair. 
Then you simply attach in the back of the chair 

Work your back piece on.

**note:When taking the chair apart I kept all the card board sheets and metal sheets I found inside the chair.

Here is where you will need to use some of the interior metal stripping, if any.

The big long pieces I used along the sides in the back of the chair; this added the nice straight line to make the fabric pull taught!!

Then sit back and admire your creation!!

Upholstry took patience and being able to walk away from the project for a while.

I came by the next day with a fresh mind and ready to work. 

Took me 4 days in all working about 2-3 hrs a day. 

And... saving me the $375.00 someone quoted me to upholster it!!!

Deal!!

Tuesday, June 14, 2011


Wanna join me under this deligtful umbrella?

And dear heavens!! I would love to have buschels of these heavenly peonies.


Uh!!! in the words of Mary Poppins: "Pratically perfect in every way!!"
It's true.. I am positively completely and utterly Obsessed with Pinterest!!!

Friday, June 10, 2011

Ikat get enough!!!!


I must find a way to incorporate some of this amazing fabric into my life. #justsayin'

Thursday, June 9, 2011

Travel Thursday's First Ed. Disney World

 I have been waiting for some time now to come up with a series I will be really excited to share.
.
Throughout my life I have been VERY fortunate to travel quite a few places.

I always see people talking about the trips (on blogs) they ARE going on and I think well.... we have a little one and just aren't traveling alot right now. But I have traveled, and I want to share with y'all some of the amazing places I have been able to see.

First thing is first.

My uncle lived in Orlando for the greater part of 20 years. He worked for the school system and as a perk often got tickets to Disney, so naturally we would visit and that would be our "outing." With that being said; I have been to disney 15 times in my life and this will be my 16th time to go this summer.

But, you see this summer is special, I get to see Disney through a child, my child's eyes. 

For a awhile there Mickey and Minnie kinda lost their luster; but not this time. We are hoping to go full force!!
This is disney 2005, for a few years this is how we hit the parks... Mainly Wide World of Sports.

Our last trip to disney is one I went on with Casey's family in the fall before we got engaged. Fall 2007


We had a great time doing "big kid" stuff. So I have had to do a tad bit of research to figure out what the "best" rides for the little one's are. 

I was severely disappointed to discover Magic Kingdom no longer has Mr. Toad's Wild Ride (my favorite ride from childhood) oh well. 

Without further adieu here is our tentative itinerary for Disney 2011.

Sunday : arrive in Orlando around lunchtime, spend the afternoon by the pool then hit up
Downtown Disney for Dinner
via weheartit
 via google
Monday:Supercalifragillistic Breakfast at the wonderful Grand Floridian Resort.
 via disneyworld.com
 The grand-jour of this hotel mystified me as a child and I can't wait to see the look on Lil' bit's face when we get here.
 via disneyworld.com
hopefully our first encounter with the character's is a pleasant one. 
(keep your fingers crossed)

After breakfast we will head to Magic Kingdom and thanks to our customized map disney sent in the mail we will know right where we are going the whole time!!
You input your "must do" rides and you can choose to either print on your own or have them mail a map to you. 
We received the fanciest envelope, and I think receiving this in the mail added to the magic of disney and further excited lil bit about our trip.

the envelope looks like this when it arrives in the mail.

After a busy morning of spinning tea cups we will head to the most magical lunch of all.
 Cinderella's Royal Table!!
Via disneyworld.com

And after lunch we will retire for an afternoon nap, after all our little princess isn't quite 3 and will surely need to rest.

Next Thursday I will map out Tuesday-Friday of our trip.

Disclaimer: for those of you who think I am crazy for posting when we will be out of town online please know I have put more thought into who will be at my house, how long they will be there, and the frequency of their coming and going than I have put time into planning this trip. If someone even thinks they are going to break into my house know... I have like 10-15 ppl coming and going by while we are out of town. So there... they will think we are having parties the whole time we are gone. haha.