Showing posts with label Tutorials. Show all posts

Monday, February 6, 2012

A banner of love

Okay so...have a confession... I like to make things really really difficult on myself.
ie.. handmake a banner without a die cutting machine! TRUTH!!

Anyway, it turned out to be quite fun so here are the steps if you so choose to join me in making one.
Here is what I started with.
note: what you think you are starting with and what you acually may end up using tends to change!
Step one:
Use the circle tracer and make your circles for the background, the cut out circles.
 Step two:
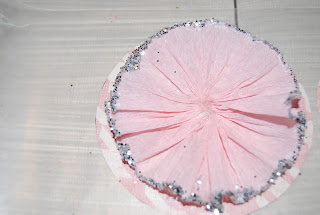
Find a needle, thread and crepe paper. Use a weaving method to thread the paper and slowly gather. this will create a ruffled affect in the paper.
*glue the backsides of the ruffle medallion together with craft glue
Step three:
Glue the center of the medallion together and let sit for a few minutes, then glue the outside edges of the medallion and dip in glitter along the outside edge.
Step four:
hot glue on chip letters, hot glue medallion onto "backer" paper
(I used the remainder of the letters of a box from a christmas banner I made)

Step five:
this was the point where I realized I needed a second background so I dug in my stash of scrapbook paper and found this stripe. I used the outer edge of my tracer to scallop this paper and cut it out.
 then hotglue the background to the other pieces.
Step six:
punch holes into the corners of the backer paper and string letters together with either ribbon or twine.

Step seven:
Hang and enjoy!

Friday, October 14, 2011

DIY-Polymer Mesh Wreath

I am not sure why I never shared this with you guys...

Ever found those beautiful mesh wreaths and thought "geez, 60-85 bucks?"

Well this year, hit up your local crafts fairs, pay 7.00 for a roll... and by thanksgiving I will post a tutorial on using a wire hanger and some zip ties around your house.... 

For 7.00 you too can have something as beautiful as this on your front door!!

stay tuned!


Tuesday, September 13, 2011

Burlee's How to!!

Have you seen these guys??

image via bella vita
image via pinterest
image via pinterest
image via pinterest
image via pinterest
image via itty bitty bella

Maybe in local home decor stores, boutiques?? and Pinterest??

They are adoreable... and surely with some craft paint, burlap and a short afternoon we could create our own... right??

So.. how do we make these cuties??

I am giving the tutorial on the football burlee!

First off, "Hi, my name is Jenny Beth and I like to make things as difficult as possible on myself. sO to save yourself the agony of painting this whole thing brown... BUY BROWN Burlap!!! Big Fat Duh JB!!"

so.. Step 1: Buy as much brown burlap as you will need, for one 1/2 a yard will suffice. I am making my mom some, and probably some pumpkins as well so I bought quite a bit.


Here are some of the "crafting" supplies you will need:
*a wide paintbrush
*skinny paintbrush (to fix the lines)
*paint in the colors you desire
*round sponge brush
*wire
*batting
*paint tray

I do apologize these tutorial pictures are via iphone but I have had several ppl around town ask me how I did mine... so here is how...


Step 2: Paint your design onto the "egg" shape. I did the brown first leaving an opening for the grey sides. 


 Step 3: Then use the round sponge brush to dot on top of the grey lines.

Freehand the football stitching at the top.

 Step 4: Accent with your left over puffer paint you have laying around...


Step 5: There are two ways to adhere the front and back of the burlee. I chose to head to the sewing machine and zip along the edges with a straight stitch. 

I have seen some at a crafts fair where they adhered with fabric glue.

**don't forget to leave an opening to "stuff" the burlee


Step 6: I made this first one super fast and in a hurry so I stuffed with craft/butcher paper. haha

The one's for sale in stores are filled with a loose bunch of pillow filling.

Step 7: Close the opening from where you stuffed.

Step 8:  Use a really wide wire from the craft store to poke a hole in the top two corners of the burlee. *Tie a little loop so the wire will not pull loose.


Step 9: Hang on your door and Enjoy!!

notice dogs and child in the background... ohh how I adore 3 little followers of EVERY step I make. :)

I am linking up over at Kellie's

and 


Monday, August 22, 2011

Upholstery- the story of a bench

Here is the story of a small bench with LOTS of potential. 

You remember that major story in April that swept through the southeast??

A lot of bad happened, but some good did come, like some awesome antiques on the curb;
enter exhibit A.

A sweet friend of mine snatched this and a few other items out of someone's "trash" pile. She knew if we  put our minds together we could make this little guy cute in no time flat!!

We had no top, so we used a scrap piece of plywood, drilled 5 holes to make a diamond shape and got to work.

1. covered in multiple layers of batting.
2. stapled the batting down
3. trimmed the excess
4. covered the batting with dr's flannel, aka curtain inner lining... same thing
5. cover buttons in accenting fabric
6. pin and sew the piping in place.

 7. attach main fabric to the cushion
 8. attached the buttons with an upholstery needle and heavy duty twine
 9. we added "L" brackets underneath to attach the cushion to
10. stapled the piping to the bench frame, and screwed on the top.

I will show a "tada" pic in my friend's uuber cute house. 


Thursday, July 14, 2011

how to recreate a painting

I am working on finishing up the art for the screened in porch. 

This whole extreme nausea thing really threw me for a loop while finishing up this room. 
(better late than never huh?)

Well here is a step by step of re-creating a painting you love and have NO IDEA where to  get it. 

first. find the painting, probably online. i found this in google images and took me to a spammer source, wasn't on etsy.. nothing but I LOVED it.

step 1. draw your version of the image then paint the solid background


2. go ahead and lay out the paint colors you will be needing while you paint.
have a glass of water laid out, some paper towels, and all your brushes.


For the blobs of green I actually just used my fourth finger to rub in the paint in certain areas. 

** i see  you asking.. why the fourth, your pointer has too much power/pressure, the middle still a little much, but the fourth is soft pressure, you can add water and move the paint around to create the blurred effect.


Instagram shots.


3. start to fill in your main color with a brush.


I used a brown/black mixture to fill in the outer lining of the crab and again blurred with the finger technique.


4. here is where you begin adding the depth to the main image, always go lighter and a little darker than you think, white is a great blender once its applied.


5. next, I used my Prismacolor, black marker to outline the image after the colors dried.
(you can buy this type of premier art marker at hobby lobby or michaels)


6. continue to add depth to the image, it is crucial at this point if you are still working on the painting to walk away at least for a few minutes and come back to the painting with a fresh perspective; also send pics to other artsy friends and ask for their "critique" for what you should add next. (I called my friend Candace)


with Candace's advice I plowed on with more white to the crab.


7.finally I added some highlighting points with my prismacolor marker.

Here is the original:

Here is my final product:

I am linking up over at Beth's for tips and tricks.