Showing posts with label DIY. Show all posts

Tuesday, November 20, 2012

Christmas Handtowel Tutorial

Hey there! 
It's been quite a while since I have shared a diy craft with yall and I wanted to sneak one in before a long weekend. 

This would be a great project for you to do with some girlfriends, or even the women in the family over the thanksgiving weekend. 

The first and most important thing to remember with this craft is to not complicate the items. 
You will need:
*any type of hand towel, 
(I found mine at target in a 2 pack for I think $3.99)
*scrap fabrics
*sewing machine or fabric glue
*some ribbon
*straight pins

1. First thing I did was trace a quarter for the berries, cut out my triangles for my trees, rectangles for the stumps, then I googled holly leaf and freehanded a shape.
(you can always print off some clipart, cut it out and use it as your pattern)

2. Pin down the design and zig zag the design onto the towel
Note: if you do not have a sewing machine or cannot sew you can purchase fabric glue and put a thin layer of glue on the pieces and attach them to the towel.

3. Attach either a ribbon or ric rac to the bottom edge of the towel.

These would make great little teachers gifts, or a happy for a friend. 

Can't wait to see and hear what you come up with!

ps. sorry for the poor photo quality, considering changing to a new camera all together because everything is malfunctioning :(
Follow Me on Pinterest

Sunday, September 16, 2012

Favorite Toys: Alex

Do you have toys that you just LOVE to get for your kids? 
I sure do! 
These were some of my favorite things when I was little and I am so glad I can purchase them at a local toy store and continue the tradition with my children.

These are my favorites thus far.
We have been working on all the loopy friends for the past few weeks!

Aren't they adoreable??

What are your favorites??

Monday, September 10, 2012

Project Fail....

Ever had one of those incredible ideas... get half way thru and think its going great...


Cut out one of your favorite cute little maps from a magazine...
(that you have been holding on to since 2005.. just sayin')

 Mix the perfect color coral


Paint canvas with beautiful coral


Then... fail fail fail with the mod podge...


Ruined... for evah!!!
makes me tear a little and yet I don't have the heart to do away with said fail...

So here's to what I thought would be a really good idea to share with you guys that turned into a really bad idea. :(

Hapy DIY'ing y'all.

Wednesday, August 15, 2012

An Annie Sloan love affair

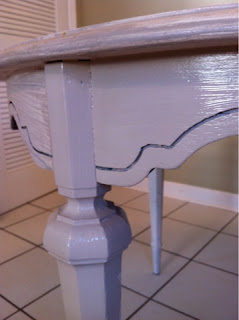
Meet my vintage kitchen table I purchased from a local antiques store. 
She was only $100.00 but perfectly matched the Restoration Hardware table I had been dreaming of. 

When we purchased the table it was a muted sage green and I was wanting more of a distressed grey look. 

This table has been with us for about 3 years.  For far far too long it sat with a coat of white, and a very very grainy distressing of glaze that I applied with a dragging brush technique to "distress."

Seen on the left of the table in the pic below. It was ugly!

Didn't take me long to fall in love with Annie Sloan chalk paint. 

I also knew the paint would be an investment so I began to save and scheme what color I would use.
The 
Here is everything painted with the base color except the bottom of the legs.

We went to visit my husband's family in Mobile, Alabama and while there my mother-in-law and I 
discovered we both have been itching to buy AS paint. 


She looked up stores in the area and the sweetest lady at Heron House helped us determine what all we needed and even walked through the steps with us. She was amazing!
Here is the table with the basecoat and beginning to use the dark stain.

Added some more stain as I got more confident. 

In this picture you can see the dark stain on the left and not on the right. 

Had I thought this through more thoroughly I would have stained in the other direction so there are no lines meeting in the middle of the table. 

Oh well. Works for me, and I will know for my next project.

And the iphone pic of the finished result. 

We have been very very pleased with how beautifully it stained.

Saturday, June 23, 2012

The Good, the Bad, The Ugly. Grouting our Shower

Soo... every home has at least one UGLY side. 
Ours was the master bathroom's shower.

For some reason it did not occur to us to try and regrout the bathroom before putting our house on the market. 

Well, here is the shameful start people.


and no, not until we took this photo did we realize some of the floor tiles had been replaced throughout the years. Oh well...


SOOO much better!!!


The wall tiles basically look brand new now!!


Friday, June 22, 2012

Our domesticated Jungle

Six weeks ago we sat out to FINALLY landscape the backyard.

I am amazed in such a few short weeks how jungle like our backyard has become. 

After our trip to the beach we kinda started slacking back there and now it is time to return it to its riteful before. 


We have NO clue what this random pole in the middle of the yard was for. This house has shown to have some pretty bizarre things. haha

And yes that is the interstate wall we back up to. Yes, it's ugly but the sound isn't bad at all!

We love being in the heart of the city and 10-15 minutes from everything!

It will be a bittersweet move when we leave here. 

Be back with pictures of how much everything has grown already!

Thursday, June 21, 2012

The Doghouse

Soo no home is complete without a dog house right??

Right!!

A few weeks ago we went to a large neighborhood garage sale and I found this flamingo pink dog house.

I just knew we had to have it, then I found out it had heated floors, a heat lamp and a fan for the summer with ventilation??
Kicking the dogs outside doesn't sound half bad now huh?
So after a fresh coat of BM Newport Navy I decided this was a good start.

Considering painting the trim antigua aqua.


I will keep you posted on that one. 

Saturday, April 28, 2012

DIY Wooden Picture Frames

**update..... August 2014, its time to revise and revamp this tutorial. right?? working on doing that right now!! stay tuned for a reveal in September 2014

Are you a fan of rustic picture frames??

(via)
These frames are by 2 princesses and 2 frogs. They can be purchased at a local store.

Here is an enormous display of some similar frames.
(via)
I am going to attempt to recreate these with some scrap wood I have in my garage.
Have you seen these on pinterest??

Looks pretty easy.
And much more cost effective to make your own!!

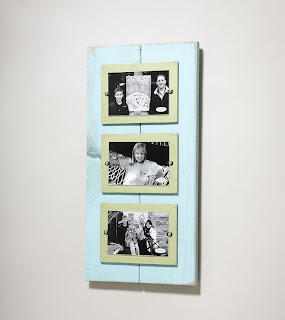
Here is what I came up with.
My "hack" for a $60.00 frame. yes... 60 bucks for scrapwood!

My inspiration:
I purchased one of these frames then decided I could make my own to create a "collection" of this type of frame.

Supply List:
*gorilla glue
*assortment of acrylic paint
*scrap wood
*small mounting  board from hobby lobby or local craft store.
*small clip frame from hobby lobby or local craft store
*paint brushes

btw: Found the mounting board on the unfinished wood aisle in hob lob.

Step1:
Gather some scrap wood and decide which direction you want the wood to go in. These pieces were actually one long 1x2 I had my husband cut down.

Step2:
Have the pieces of wood cut the same length and use your gorilla glue to make a small bead of glue between the wood. 
Sit and let "set" for a little over an hour.

Step 3:
Paint the scrap wood layer with a coat of paint and let dry
Paint the mounting board layer and let dry.
Step 4:
Use your gorilla glue to do small dots or a bead of the glue, don't forget to lay something heavy on top for the glue to disperse evenly.

Step 5:
Nail a small nail into the mounting board to attach the clip frame from,
also sand the edges of the mounting board and the edges of the wood.

Step 6: 
Decide where to hang, what picture to use, then step back and enjoy!
I think a new school picture will do nicely!
(sorry this one is crooked)

For comparison:
mine $3.00
theirs $60 + tax


LOVIN' $3.00 ALL day Long!!